

How To Install Vinyl Base Moulding
Full general Overview for installing vinyl siding Do'due south and Exercise Not's
 Earlier nosotros get started let's quickly talk near what this guide is non. This is not a definitive installation guide for every type of vinyl siding on the market. This will explain the main points to consider and give you some neat idea'due south Really information technology is not that hard to install vinyl siding at all. Delight read your brands installation guide and head all warnings. Also, if you do not feel comfy doing something like working off a ladder etc HIGHER A Professional
I am going to talk about a lot of tools hither so if yous demand some suggestions head on over to my tool page for recommendations.
Prepping the wall for vinyl siding installation
An oftentimes rushed through pace that can come up dorsum to seize with teeth y'all years later on. Make certain you accept a good surface to install your vinyl siding to. If you are going over sometime wood siding we HIGHLY recommend the installation of a foil backed insulated foam board first. This will help even out the wall surface while besides calculation some R value to the wall. YES get the foil backed kind and install toward the inside wall of your home if colder climate to reflect heat back to you in the winter. In southern states with a balmy winter you lot may want to install the foil facing outwards.
IF you are removing old vinyl, wood or aluminum hither are some things to consider.
- This is most probable the last fourth dimension yous will accept open access to the exterior wall and this is a Cracking Time to hide cables wires etc…
- If yous want to road any new electric for fixtures etc relieve your electrician the headache and do it now.
- Do y'all have an older habitation with not insulated walls? It is easier to fill them now by drilling some holes for blown in insulation or foam spraying than later.
- REMOVE the old nails so they practise not after work out and beginning showing through your new siding.
- Replace rotted wood NOW information technology will make the rest of the job get smoother
- If you do not take a previous vapor barrier installed now is the time
Install your insulated backerboard if not using an insulated siding panel
We have mentioned this earlier and with a fresh wall this will get very neatly and help for convective heat loss (R Value of Foam) Radiant rut loss (if you lot go foil backed) and air infiltration making your home much more energy efficient. Fan-fold backerboard is the virtually popular and like shooting fish in a barrel to install (Use plastic cap nails), if yous are really motivated you can get 1″-2″ Foil backed cream board just make sure to record the seams with foil tape. Take your time on this step and go tight to your doors and windows caulking whatsoever spaces left over. Butt Joint the corners of home with a small overlap on 1 side keeping everything flat. Tape the corner joints.
POSSIBLE NEED FOR FLASHING
At this betoken with the siding removed you can see if your windows and doors need to be flashed to the sheathing. If they are not already now is the time to practice information technology and this will save y'all trouble down the route. If there is non at to the lowest degree either metal or peel and stick flashing on the top of the windows and doors add it now. You are going to have to remove the exterior brick mould or casing around the window. Then cover the nailing flange and nails with flashing. Attach to to substrate wall (forest sheathing usually) If y'all are motivated and also want to help with free energy efficiency nosotros recommend doing this around the entire perimeter of the windows and doors. If your home already has replacement windows installed yous can still practise this just to embrace the small gap that will exist between the window and the framing. (This is also a GREAT time to insulate, our peak choice no pressure expanding foam) The business firm wrap in you adjacent step goes right over any flashing you have installed only make sure not to penetrate it with any nails or staples.
Installation of J Blocks, J Channel, Utility Trim, Within and Outside Corner Posts
I'yard deplorable, no you tin't throw up your siding panels just even so. If you properly install all of the "trim" blazon pieces talked about hither the panel installation will be a slice of cake.
-
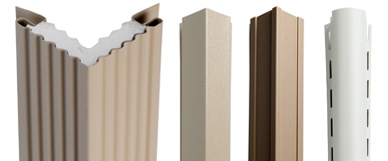 Corner Mail service– This is equally practiced a place as any to start getting some vinyl on your dwelling. Corner Mail service come in a diversity of sizes from 3″-7″ Fluted designs. They are 1 of the easiest components to install. More often than not they come in 10ft sections, identify them snug against the wall and down to lesser of siding level. Nail with 1/sixteen″ between caput of blast and flange to the wall in the heart of the nailing flange every eight″. The very top of the corner post should be prepare downward 1/4″ from overhang and the nails here should exist at the top of the nailing slot.Handling Splices– We highly suggest overlapping the upper post to allow a natural path for water to follow. Practise and then by cutting off with your tin snips 1″ of the upper post nailing hem then sliding the mail service over one″.Within Corners are installed identically just where two walls form an interior corner
- J Channel – The near widely used accessory slice on your dwelling house. You will in all likelihood existence trimming out all your doors and windows with J Channel. It comes in varying widths then brand sure yous go deep enough J to encase your siding panels. The essentially hide the cut border of the siding and the 1/4″ or so gap y'all volition exist leaving for expansion and contraction when you install you panels. There are two ways to install J aqueduct – simply cutting to length and foursquare off the corner by removing some of the nailing hem. The preferred method in to cut a 45 caste angle for the corners and so curve the base textile down onto the side portions and around the bottom to give h2o a path to follow. A new product for the not equally talented DIY'due south out at that place are J corner – They give a groovy appearance to square cut corners. Information technology is also place at the top where the siding terminates to the soffit.
- Gable Vents– Please do not leave your one-time wood or aluminium gable vent on when residing your abode. Selection up a matching vinyl gable vent from your siding supplier or one of the many accompaniment suppliers that offer them in a broad variety of colors. There are available in all sorts of shapes and sizes including, round, square, rectangle, octagon and triangular
- .
- Utility Trim – Often overlooked but highly needed is utility trim. Put simply UT (Utility Trim) holds cut pieces of siding in place(typically under J channel to terminate them from coming out or flopping around in the wind. UT is placed within the J aqueduct under all windows and the upper termination J at the top of the domicile. Afterwards when installing your panels you'll use the snap dial creating a tab on the panel to lock into the UT..
Stride V – Starter Strip Installation
Steel Starter Strip Use This
 Exercise not rush the process of properly installing the starter strip. It is a Disquisitional part to get absolutely correct. This one accompaniment volition determine if your siding looks straight and has an even reveal when you go to the acme.
A word of caution – We have pictured here at the left a galvanized steel starter strip which is ane of the more expensive options, simply WELL WORTH IT.**Special note, some higher end vinyl with lock downward panels etc come with their own starting strips, these are for the nigh function a heavier duty version of cheap vinyl starter and fine to utilize.** The cheapest way to become is simply cut the nailing hem off of a siding console and apply that to agree the lesser of first panel in identify. Nosotros don't like vinyl for two reasons. Ane, it is the weakest connection point and this area is ofttimes times the most stressed. Two, it is too easy to mess up, that it not put on perfectly directly because you can easily bend information technology.
Here on the correct yous can run across a starter strip hanging down to overlap the foundation, if need be this can be moved upwardly a little over an inch or so.
Information technology seem relatively direct forrad y'all just nail information technology in every 6″ through the nailing hem, you can use the aforementioned nails every bit the accessories and siding.
BUT FIRST MEASURE – the altitude from the bottom of starter strip location to the superlative of dwelling house. Why you ask? – you can tweak the starting point a lilliputian by letting the siding hang down past the lesser border over a foundation or bringing information technology up as far as possible to ready flush. There is even extra wide starter strip to aid with this. The reason existence if you need to cutting the acme panel you want to take enough material to piece of work with on the "lap" in order to snap punch and properly secure. Nothing is worse than only needing a 1/2″ of cloth to finish. So divide your full pinnacle by the panel reveal and PLAN accordingly.
Additionally, if you want your panels to line upward on all side of the domicile, adept planning at present volition make it easy. Have your chalk line and marker all the way effectually – commencement find the Depression on the most visible side of the home and utilise that equally your reference. Every bit long as at least one console will end up existence on line with the adjacent side everything will come out beautifully. Utilise a level every bit you go on top of the starter strip sections to make sure yous aren't sneaking low or high on ane terminate.
Here come up the panels!
Aye, finally you are prepare to put on all the panels. In fact this stride while information technology makes the greatest visual impact and finally looks like you lot are doing something oftentimes goes faster than all the preparation.
Some things to go along in listen when installing
one) Smash Length – Brand certain you are using long enough nails – The nails need to penetrate into the wood substrate (normally OSB) at least 3/4″. So if you are using a 1″ cream board for instance you need two 1/4″ nails minium. ane″ to become through foam board – 3/4″: inch into the substrate, maybe 1/sixteen″ to 1/4″ for the nailing hem on the siding, and 1/16″ to 1/four″ for the siding to hang on. DO NOT NAIL TIGHT. The siding needs to "float" Just going through house wrap with no insulation and a cheap panel with small nailing hem? i″ nails may be all you need.
ii) How frequently and where to nail? Nosotros recommend nailing every 8″-x″ which is one the conservative side of most manufacturers recommendations which allow for sixteen″ spacing. Although you may exist just fine at 16″ spacing unless you are marking every stud to make sure you are sinking the nails into something very solid 8-10″ will continue you lot safety.
Blast IN THE CENTER – Direct – Please place your blast in the center of the slot on the nailing hem to allow movement from side to side. Also do not drive the nails in at an angle. Maintain a parallel line to the ground in order to make sure you are not pulling the panel or creating undo stress on the hem. Retrieve when the siding locks into the bottom piece that is doing the work of keeping the panels straight. As long as you followed are instructions with the starter strip installation you practice not need to correct anything while installing the panels.
3) Cutting and overlapping the panels – The standard length of vinyl siding panels is 12 Feet 6 Inches long. Which probably means you will finish up having some seams to deal with. Additionally, nosotros'd similar to make a point that when installing with a lilliputian planning you can choose where those seams cease up.
4) Great now there's a window, vent, door etc...
 No worries with a little time you lot'll have this role downwards in no time and loving the results. Now is where that utility trim (you already installed) and snap punch tool come in very handy.
 Start when you get to the panel that volition need to be cut depict an outline on the panel (mistake on the side or being likewise tight, or not enough trimmed) you tin can ever cutting more subsequently but adding siding back is a little vexing. Employ a utility knife and directly edge to make any lengthwise cuts after you cutting down with tin can snips for the vertical cut. Wiggle back and along when you get two/3 way through the textile and the scrap will pause loose. Now using your Snap lock punch tool create some notches iii″ autonomously with at to the lowest degree one on each finish. These notches will lock into the utility trim when you slide the panel up under the J Channel. Avert the number ane mistake here of not leaving enough siding material to fit into the hidden utility trim and form a bond. Some installers even prefer adding a dewdrop of caulking before snapping in place. Follow the aforementioned procedure in opposite for acme of windows or doors but know there is not suppose to be whatever Utility Trim here. Instead if the window is over 3ft long we recommend creating some caulk prepare points every 12″ or so only to assistance with uniform panels appearance. DO NOT run a continuous bead inside the J aqueduct this will create water pooling.
v) Cut gables or angles
 Once you get the showtime cut down this is a piece of cake. Many first time installers recollect they can effigy this out by "eyeing it" holding a piece of scrap near and making angle cuts till they "go it" . While this may work there is a much faster fashion. Amazingly enough they actually make a tool for finding angles then you can just transfer the angle to the siding and cut away. Identify this tool even with the horizontal ground line then move one side up into the rail. Transfer the angle mark to a scrap piece of siding, cut and use as your template for marking remaining pieces. You can use the same1-2 ft. piece of scrap and marking both sides. This is a particular handy tool for going around odd angled windows.
Cheaper Solution –Another method that has been used for years is to hole a wide board flush with the underside of the overhang(or inside the J channel if information technology will fit), then use the bottom to marking siding that has been installed as close as possible. Marking this will transfer the exact bending the the corresponding siding piece giving yous the reference mark you lot need.
.What to practise at the top? Triangular piece? – Don't overcomplicate this, at that place are two methods one can use here. Our favorite is to install some small sections of that utility trim nosotros used under the windows and at the top of the walls on either side of the gable. Apply your snap punch tool on the terminal piece at the top on both sides and slide the triangular piece up to snap in both at the top and the bottom. Alternatively, for the somewhat less motivated, go a colored nail and drive it through virtually 1-two″ down from the top. Dipping the smash in caulk showtime may assist seal out moisture although this area is usually well protected. Usually you are pretty high upwardly at this point and seeing the small trim nail from the ground isn't noticeable. The thing we don't like about the "piece of cake manner out" is over time the nail will work it'southward mode out and you may end of finding that last piece in your neighbors yard!.
I thought I was done!External Accessories
Well perchance you are and mayhap you are not. Many people end here and that is fine, yous have a beautiful, hopefully efficient outside sided home to enjoy for years to come. Desire to add a little extra? – It'south easy. The almost common accessory at this bespeak is shutters and they are simple to install.
- Choose a coordinating colour (that is one that is DIFFERENT, from your siding color but goes well with your base colour choice) if in dubiousness ask your wife. These simply screw into through the siding with the provided hardware. Be conscientious about screws provided if you accept added extra depth to your wall by way of insulation. You may need to become only some longer screws we recommend stainless steel with a bore matching the included hardware, long enough to penetrate the house capsule by at to the lowest degree 1″.
- Get shutters slightly bigger than the openings if your exact window size(with trim) is non bachelor) Hold them up so an equal altitude is revealed(if larger) on top and bottom and use a pencil to mark the hole locations.
- Predrill the siding at the intended hole locations then install some waterproof caulking in the hole and plenty of it. This will waterproof the hole equally you spiral thru it.
- Put your shutters upand install them with your screws, taking special care not to OVERTIGHTEN, Tighten to just snug as not to warp or curve the shutters.
- Utilize the included plugs to cover the holes.
Savor A Task WELL DONE!

Source: https://www.researchvinylsiding.com/how-to-install-vinyl-sidings-tips-tricks-etc/
Posted by: woodyknour1946.blogspot.com
0 Response to "How To Install Vinyl Base Moulding"
Post a Comment